Setup SAML authentication
Overview
Security Assertion Markup Language (SAML) is a standard for logging users into applications based on their sessions in an external Identity Provider (IdP). An IdP is a system entity that creates, maintains, and manages identity information for users while providing authentication services to relying applications within a federation or distributed network. Identity providers offer user authentication as a service. Trusted SAML metadata ensures a secure transaction between a SAML identity provider (IdP) and a service provider (SP), i.e. Pliant in this case. This single sign-on (SSO) login standard has significant advantages over logging in using a local username/password:
No need to type in credentials (if authenticated elsewhere using the same Identity Provider(IdP))
No need to remember and renew a second set of credentials
Password policies are automatically enforced by the IdP
Multi-factor authentication (MFA) could become available via the IdP
This document describes how to enable SAML in Pliant.
Hostname Setup
You need to set the hostname for the Pliant installation as a Kubernetes environment variable in the pliant-api deployment. All Pliant-based URLs used for SAML authentication are generated from the HOST_URL variable. If you are using a Pliant hosted instance, please contact Pliant Support (support@pliant.io) to perform this step. Otherwise, you will need to have access to a console that can run kubectl commands for your Pliant instance (Example process shown in BASH shell on Linux).
1. Replace “instance.domain.io” in line 1 with the actual fully qualified domain name or IP address
host_fqdn=instance.domain.com
2. and run the following command from a Pliant host node:
entity_id=${host_fqdn}-spa
kubectl set env deployment/pliant-api -e HOST_URL=https://${host_fqdn} -e SECURITY_SAML_SP_ENTITYID=${entity_id}
Setting Up SAML via Pliant UI
IMPORTANT: SAML settings changes can take up to 60 seconds to be in effect. Please wait 60 seconds between saving and testing your settings!
To verify the settings above have been applied correctly:
Login as an admin user
Go to Admin / System Configuration / SAML
Check the URLs on the right are correct:
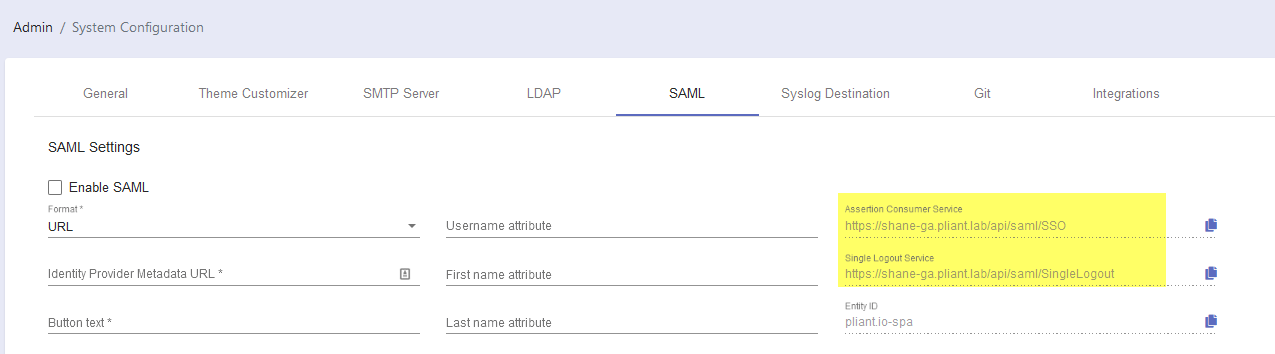
You will need to provide these fields to your IdP as you configure it to work with Pliant.
Once everything above is set up properly, do the following:
4. Tick the checkbox called Enable SAML
5. For Format, you can choose one of the following options for the Identity Provider Metadata:
URL - Pliant will get all the IdP metadata from the given URL
XML - Paste IdP metadata XML that contains the IdP certificate, the entity ID, the redirect URL, and the logout URL
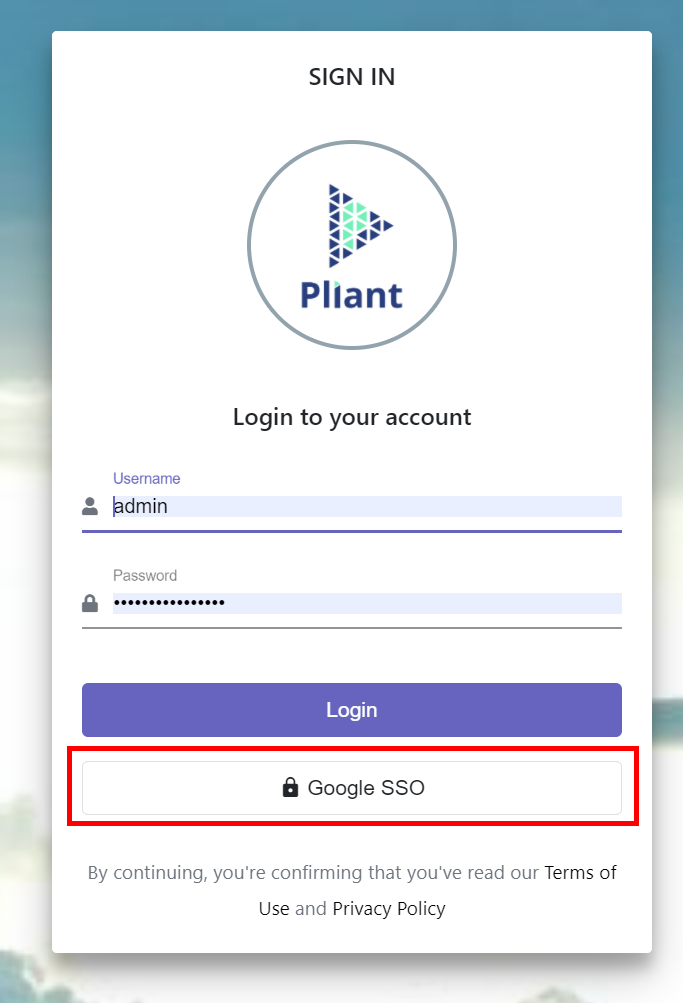
7. Button Text - The text you want displayed on the button. For instance, setting the button text to “Google SSO” will make the button look like this:
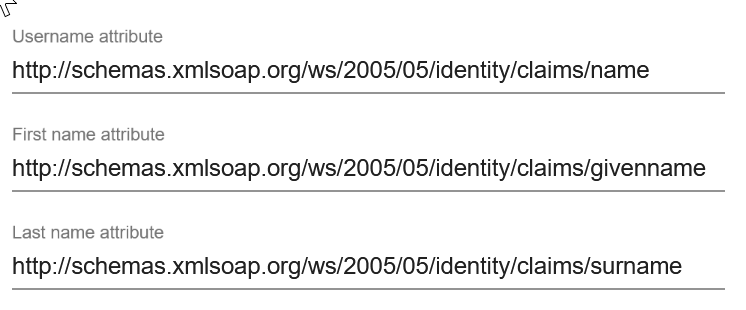
8. Username attribute, First name attribute, Last name attribute - the attribute names (SAML claims) returned from the IdP for username, first name, and last name. These can vary greatly between different IdPs. For example, this would be the default configuration for AzureAD, where the full namespace and claim name must be provided:
IMPORTANT: SAML settings changes can take up to 60 seconds to be in effect. Please wait 60 seconds between saving and testing your settings!
Some important things to consider
The identity provider acts as authentication provider only. All permissions are controlled inside of Pliant.
SAML is used as a single source of information. If SAML authentication is enabled, even if you change the first or last name, they will be overwritten again the next time you login using SAML.
If the user does not exist in Pliant, and can authenticate via SAML, they are created in Pliant as a user with no associated roles.
AzureAD and ADFS both use the long names for the claims (eg http://schemas.xmlsoap.org/ws/2005/05/identity/claims/name)
AzureAD cannot return groups by name unless they are groups that are sync’d from a premise Active Directory instance, so it is effectively incompatible with the role to group mapping.
AzureAD has a very long SAML token lifespan compared to the default Pliant “max authentication age” setting. This can cause “401 unauthorized” errors when trying to access Pliant in Edge using SSO. When using SAML with AzureAD, change the “max authentication age” setting from 7200 to 7500000.