Deploy a workflow using API Gateway
Overview
This is a step-by-step guide on flow deployment using the high-security API Gateway system.
Once deployed, workflows are considered active. Relevant limitations are reflected in your license.

Before you begin
Deployment can occur only when certain conditions are met. You need to have at least one API, stage, and endpoint.
1. Choose an API
Navigate to the APIs page.
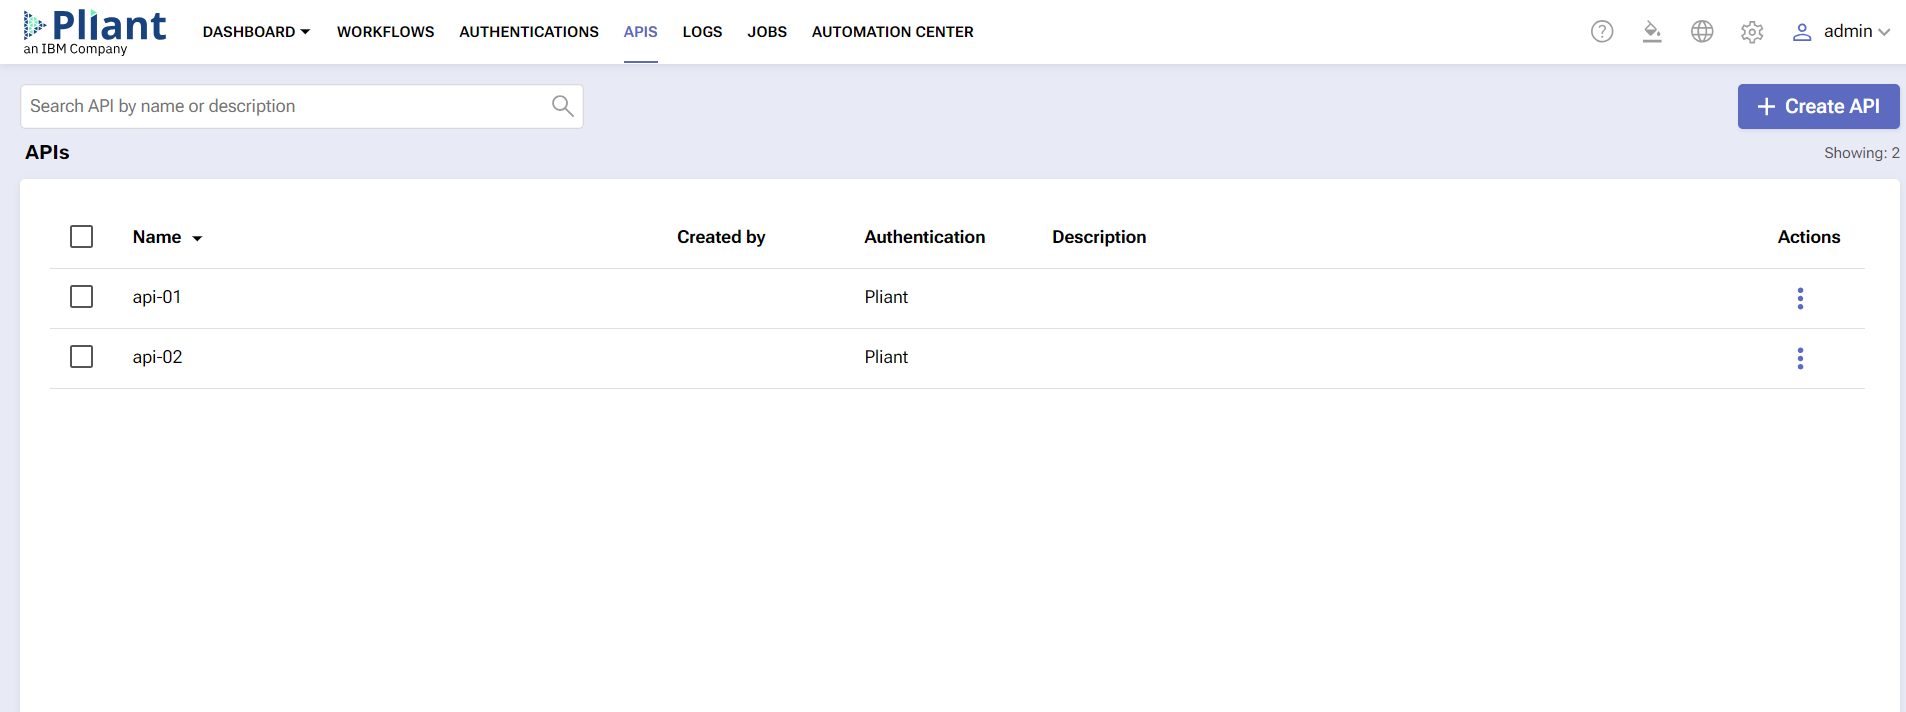
APIs are collections of endpoints, which are organized into several stages.
They’re responsible for the successful deployment of a workflow, providing organization and security capabilities with the help of specific API keys.
If you still don’t have an API, learn how to create one.
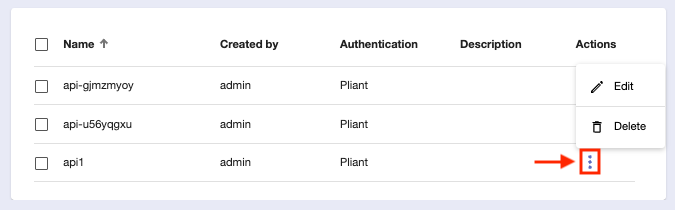
When you’ve chosen your API, click on its row or select Edit from its three-dot menu.
You’ll be taken to the Flow Deployment module. It’s a page that consists of four separate sections.
By default, you’ll always see the status of your deployments first. If you don’t have any, the page will be empty.

To configure your selected API, navigate to the Settings seciton.
There, you’ll be able to change the API’s name, description and worker group, as well as define authentications and configure advanced settings.

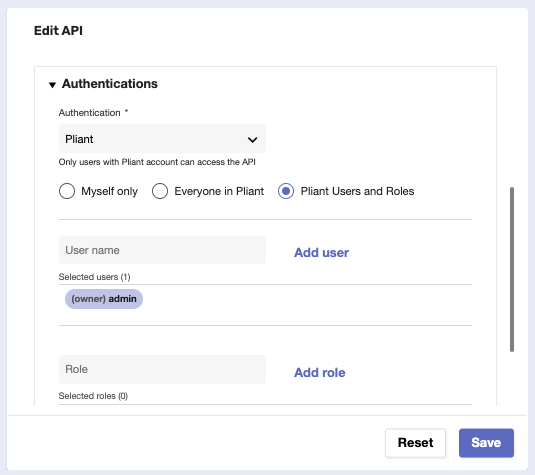
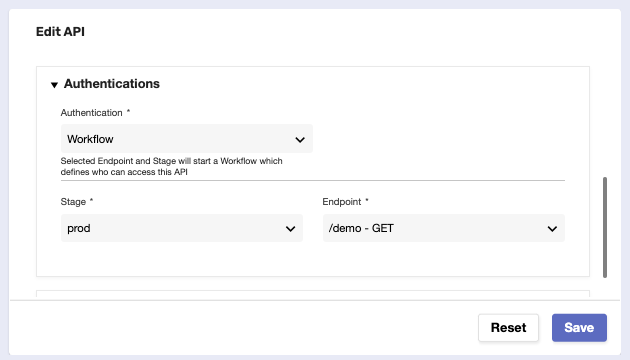
If you click the Authentications tab, it’ll expand a couple of settings:
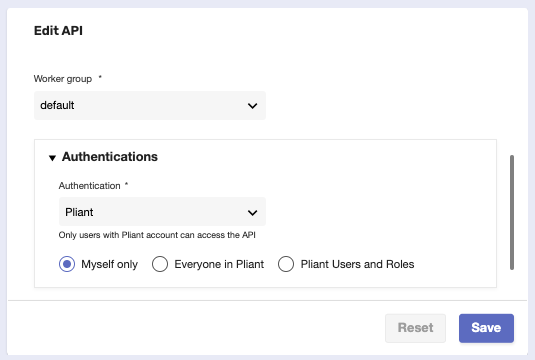
There are three types of authentication policy your API can enforce:
Authentication | Meaning |
|---|---|
Pliant | Only Pliant users can access the API.
|
Anonymous | Anyone having the deployment link can access the API.
|
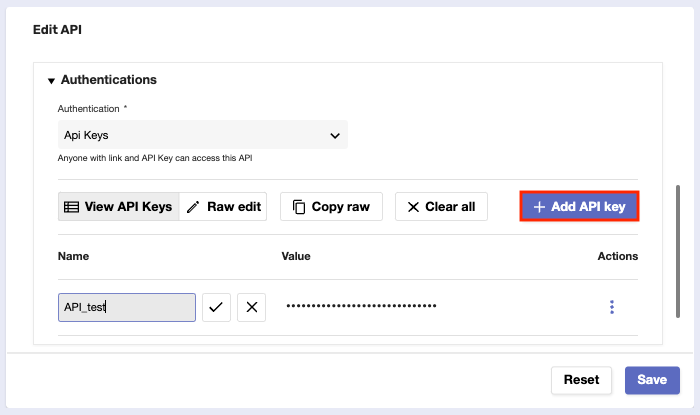
Api Keys | Only users who have a deployment link and a specific API key can access the API. To add a specific key for the API, click the Add API key button and give the key a name.
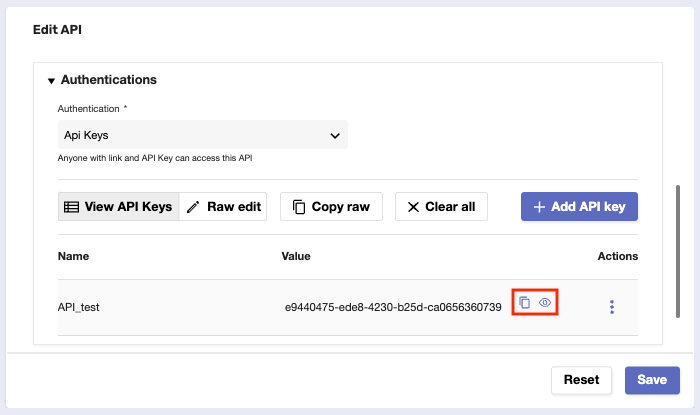
Use the check mark button to save the name. You can then copy and reveal the API key’s value.
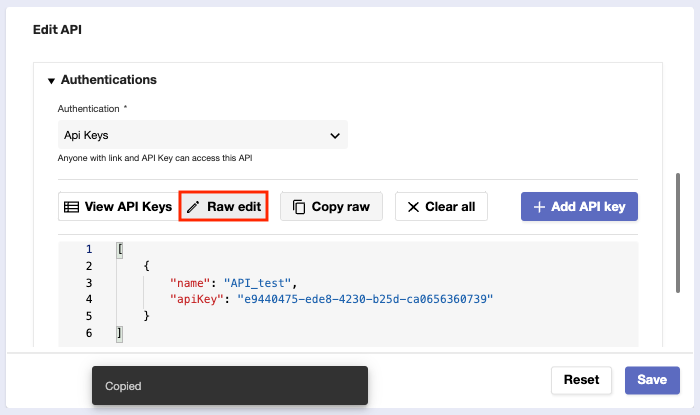
Using the Raw edit panel, you can see and edit your key(s) in a code editor. Copy the code instantly by clicking the Copy raw button or delete the key(s) with Clear all.
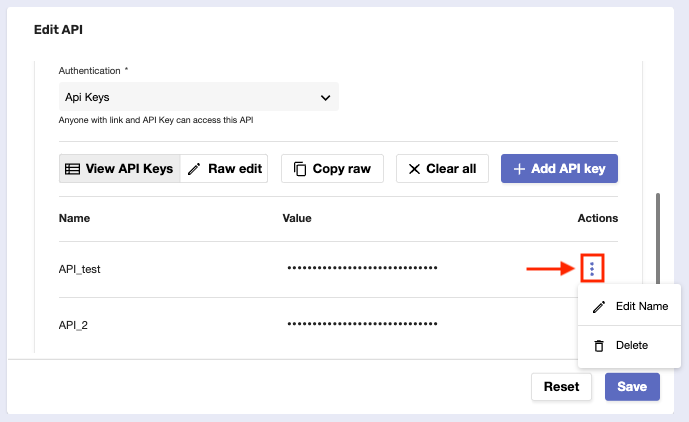
You can change the name of an API key or remove it completely from the Actions column.
|
Workflow | With this option, you need to select an existing stage and endpoint pair on which an existing deployment is based. This pair can then start a workflow which defines who can access the API. The process works like a security layout between the API gateway client and the workflows executing actual business logic.
|

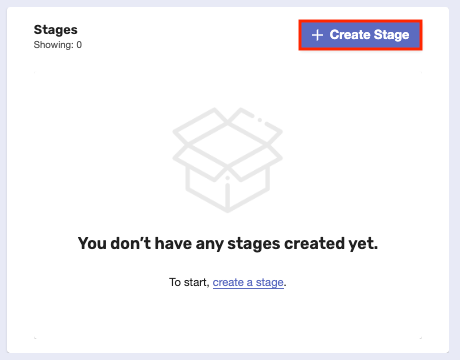
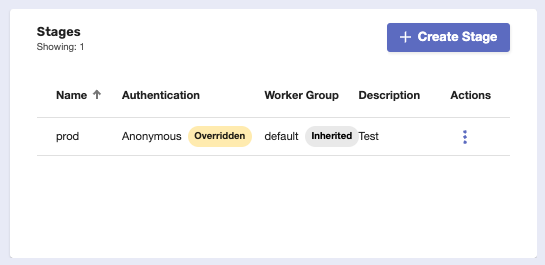
2. Create a stage
It’s not possible to have or make a deployment without having at least one existing stage.

Stages are parallel versions (or states) of an API that can be used for different purposes.
A single API can have multiple stages working exactly the same way but running in different environments.
Most common examples include prod, development, qa, and staging.
Click the Create Stage button to add your API’s first stage.
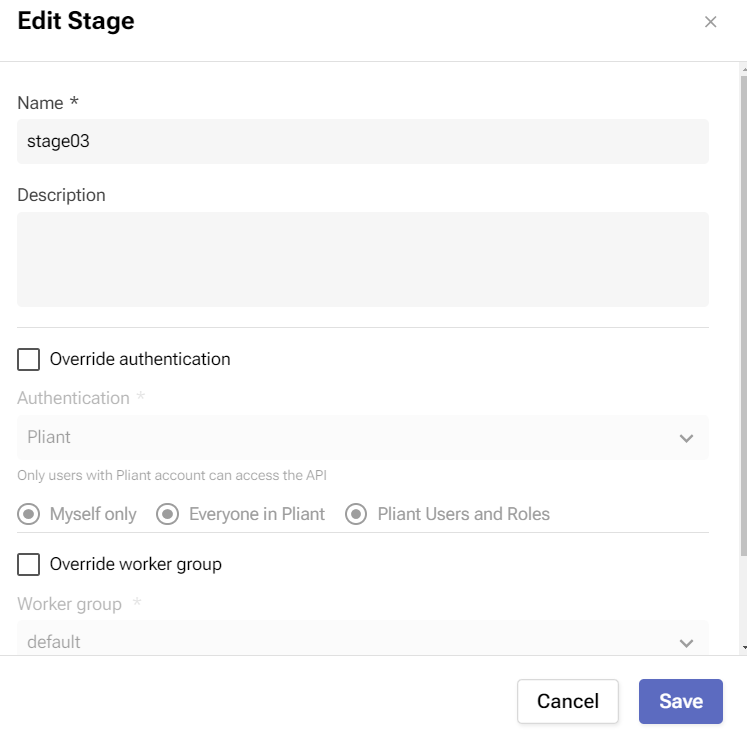
Go through the fields in the window that opens. A stage only needs a name in order to be created, but you can configure it with many additional settings.
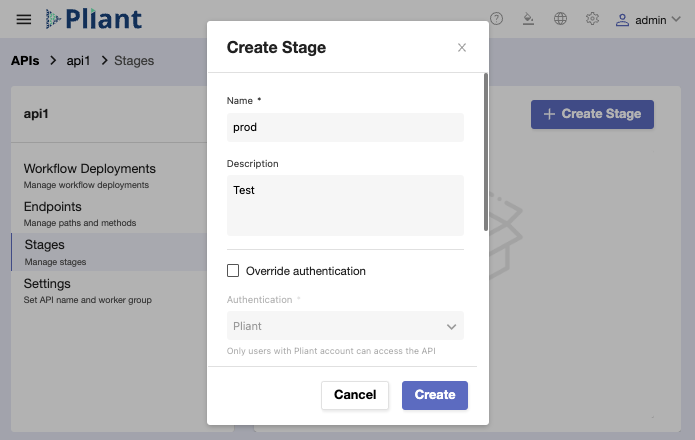
Name - name of the stage.
Description - optional description for the stage.
Override Authentication - if checked, it allows you to define the stage’s authentication policy.
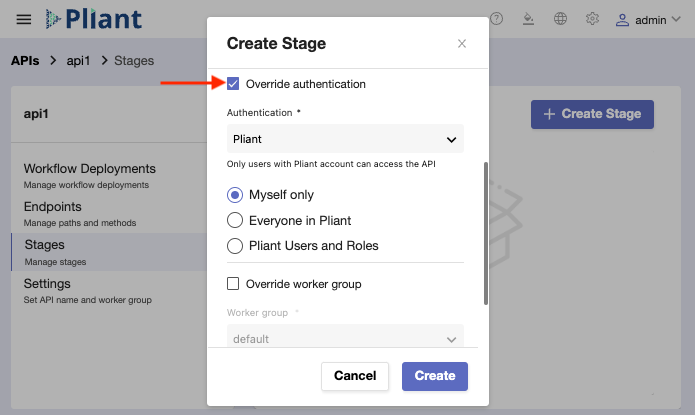
Authentication | Meaning |
|---|---|
Pliant | Only Pliant users can access the API on this stage.
|
Anonymous | Anyone having the deployment link can access the API on this stage. |
Api Keys | Users with deployment link and a specific API key can access the API on this stage. |
Workflow | An endpoint and stage pair (on which an existing deployment is based) will start a workflow which defines who can access the API. |
Override worker group - if checked, it allows you to define the worker group the stage is going to run on.
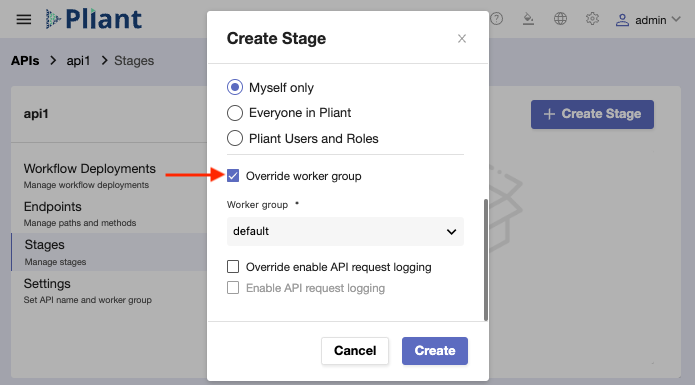
Override enable API request logging - if checked, it allows you to enable logging for each API request.
Be aware that this will flood the database with unnecessary logs if forgotten.

When you’re done, click Save to finish adding the stage. Values which are not overridden remain inherited.
Stage actions
There are three actions you can perform on a stage. Click the three-dot button in the Actions column.
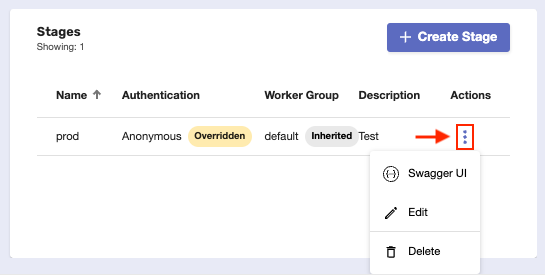
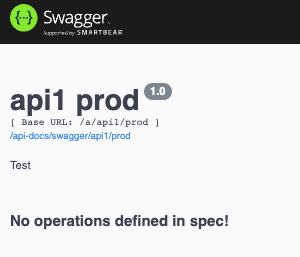
Swagger UI - this opens a separate page, allowing you to see a Swagger definition for the stage.
Make sure the stage is used in an active deployment, or the page will show up empty.
Edit - this opens a separate window where you can make changes to the stage’s currently defined properties.
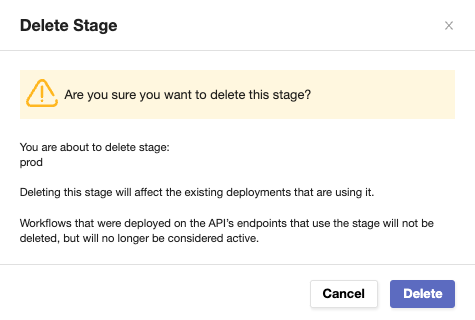
Delete - this will delete the stage. A confirmation warning message will pop-up.
3. Create an endpoint
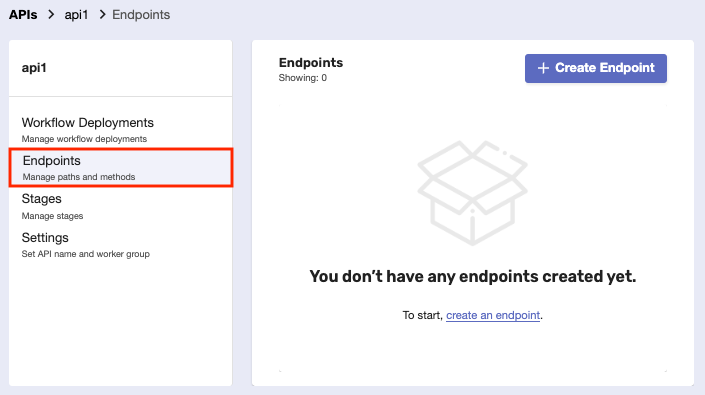
This is the final element needed for deployment. Navigate to the Endpoints section.
Endpoints are strings that correspond to the URLs which you need to hit so that the endpoint can be triggered for a particular API stage.
They’re essentially small paths that get stacked to the end of the URL - the name of the command as it will be known to users.
Each API and stage can have different endpoints, with basic HTTP methods supported.
Click the Create Endpoint button to create your first endpoint.

Go through the fields in the window that opens. An endpoint only needs a path and a method for its creation.
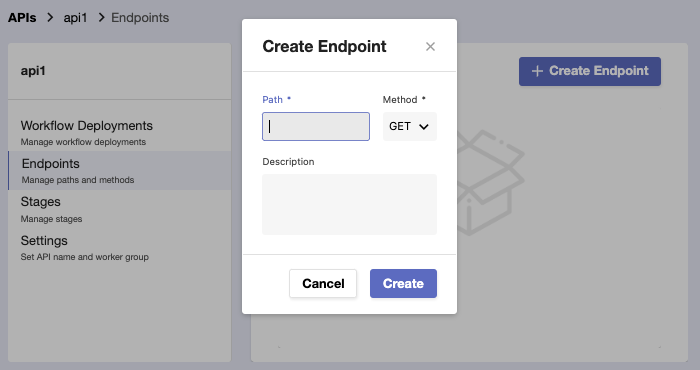
Path - the path of the endpoint (starts with a slash)
Method - the HTTP method the endpoint will use (GET, POST, PUT, DELETE or PATCH)
Description - optional description for the endpoint.
When you’re done, click Save to finish adding the endpoint.
Endpoint actions
There are two actions you can perform on an endpoint. Click the three-dot button in the Actions column.
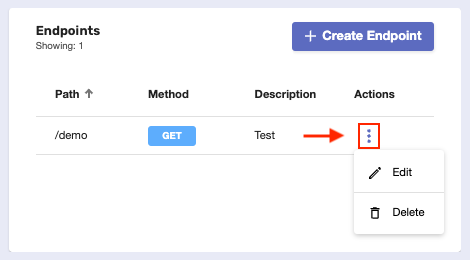
Edit - this opens a separate window where you can make changes to the endpoint’s currently defined settings.

Delete - this will remove the endpoint. A confirmation warning message will pop-up.

4. Link the endpoint with a particular workflow
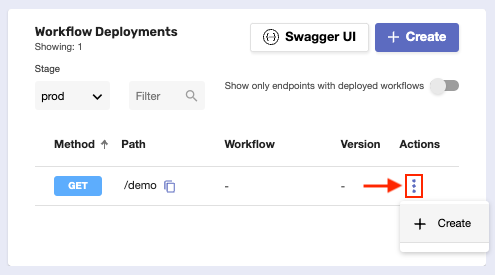
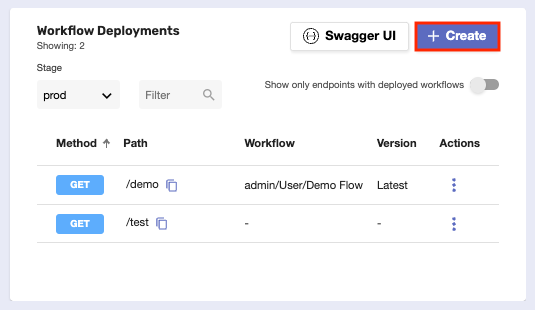
Now that you have everything needed for deployment, navigate to the Workflow Deployments section.
You’ll see an empty row for the endpoint and stage you recently created.
Endpoints that are not linked to any workflows are considered deleted, but you cannot actually remove them from the tab - you’ll have to erase their stage and endpoint instead.

Create a deployment
Click Create from the three-dot button in the Actions column to begin setting up a deployment.
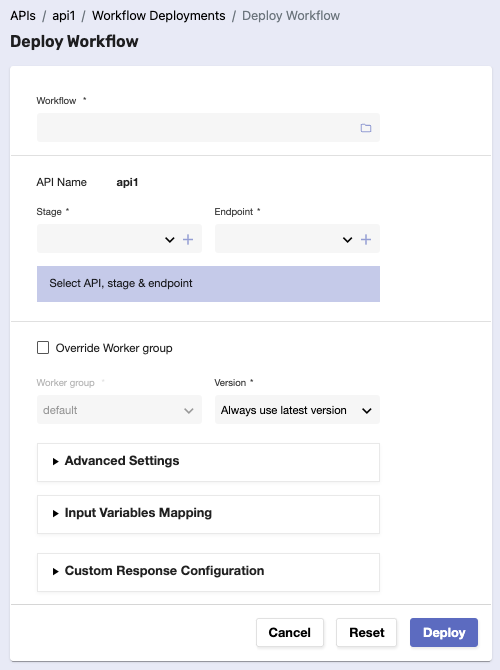
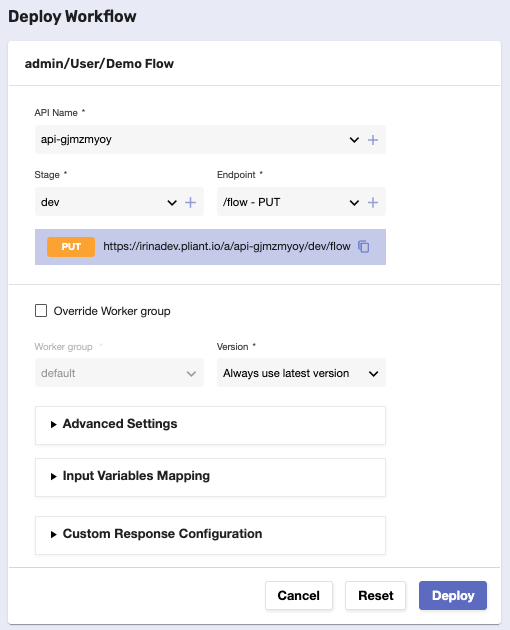
You’ll be taken to the Deploy Workflow page.
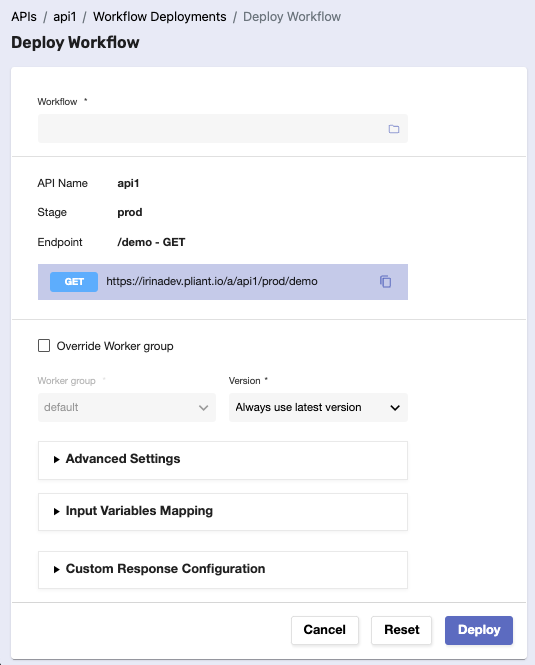
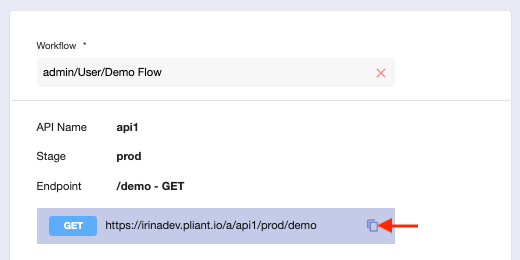
Here, it’s necessary to select the workflow you want to run on your already selected API, stage, and endpoint.

Once that’s done, take a look at the available settings and features:
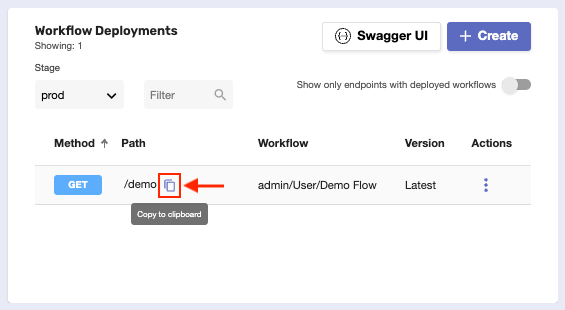
Copy the unique link of the deployment with the folder button and paste it in the URL bar to access the deployment externally.
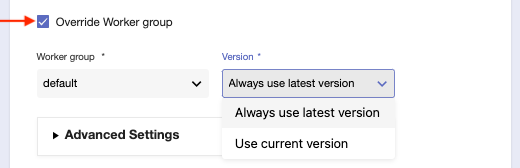
Overridde the worker group of the flow, if needed.
You can also select which version of the workflow you’d like to use - current (workflow freezes in time, not being able to change at all) or latest (always up-to-date).
The Аdvanced settings section allows you to override and change different settings defining how the flow should run.
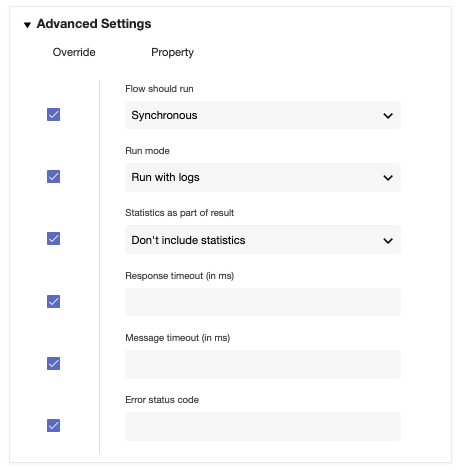
- Flow should run - the way the workflow will run (synchronous or asynchronous).
- Run mode - decides whether the flow should have dedicated logs (slower run) or in real-time (no logs, faster run).
- Statistics as part of result - decides whether there will be statistics included as part of the flow execution result.
- Response timeout (in ms) - time interval after which communication between the worker and API is lost.
- Message timeout (in ms) - time interval after which an internal message states that the communication between worker and API is lost.
- Error status code - the status code of the error generated after the timeout.
The Input Variables Mapping section allows input variables from the workflow to be mapped as parameters and assigned custom names.
This gives you more control and flexibility in your data mapping process when deploying workflows.
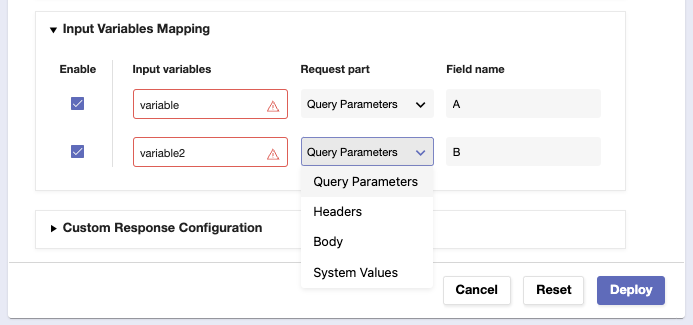
Override the default mapping by clicking the Enable check box. This lets you define the request part - whether a variable will be a system value, query parameter, headers, or body.
Assigning field names will additionally customize the variables by giving them alternative names that will be used for the deployment.
Keep in mind that input variables of non-string types will produce warning messages. You can still proceed, as upon deployment, they will be converted into strings regardless.

Custom Response Configuration gives you additional control over setting up the deployment response.

- Status Code - the status code of the response (from 100 to 599 or text).
- Body - the body of the response.
- Format - the format of the response (JSON, STRING, BINARY).
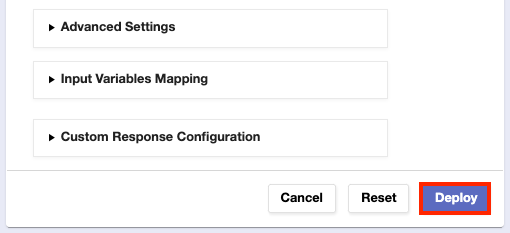
When you’re done, click Deploy.
You’ll be taken back to the Workflow Deployments section where you’ll find your first completed deployment.
Click the folder button to copy the full API deployment path URL.
Since the flow is now deployed, you can test the link right away. Paste the Url in a separate tab and you should get a similar result:

To see the deployment’s Swagger definition, click the Swagger UI button.

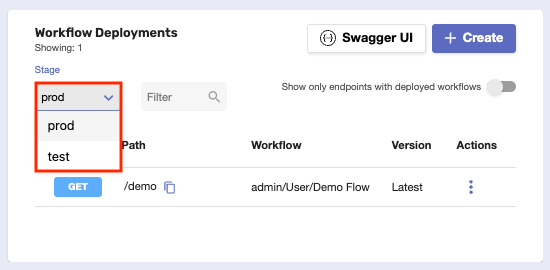
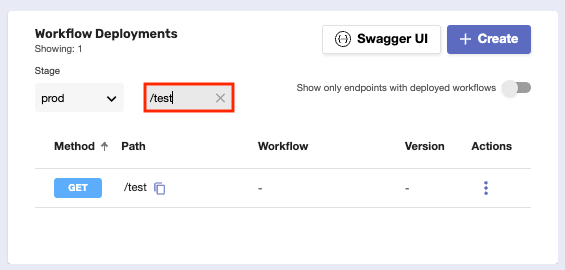
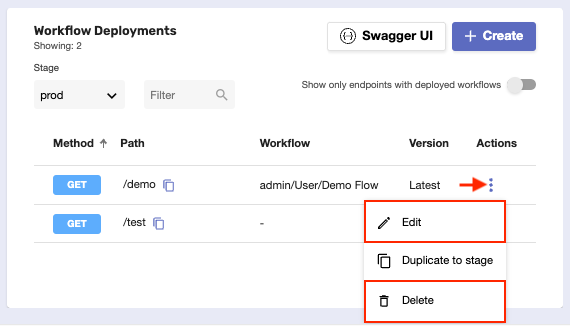
When you have created several deployments, consider taking advantage of the following options:
Filter by stage - display deployments that have been made on only one of your existing stages.
Filter by path - locate specific deployments by typing their path names.
Show only endpoints with deployed workflows - separate endpoints without deployed workflows from the list of deployments.

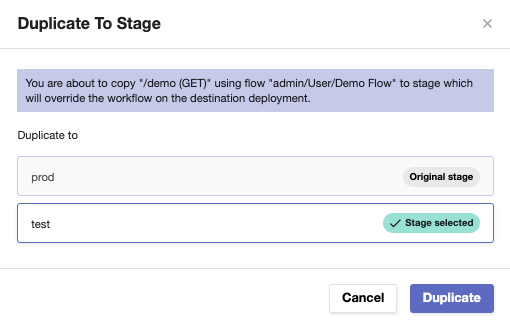
Duplicate deployments to stage - create a deployment on a new stage by using an existing deployment as a template.
Keep in mind that this feature becomes available after you create the deployment.
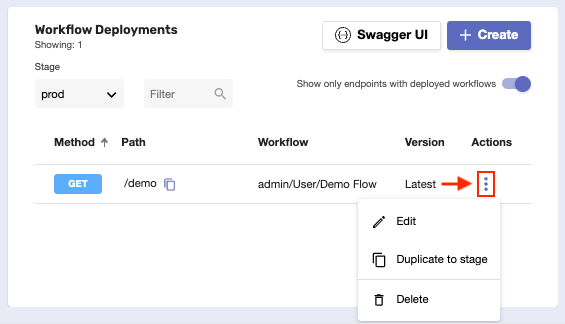
This will open a separate window where you’ll need to select the new stage on which you want the copied deployment to run on.
Edit or delete a deployment - make changes to your existing deployment or delete it entirely.
Deployed workflows have a green Deployed status in the Active column on the Workflows page. Scheduled workflows can also be deployed.
Direct deployment
There are other ways to deploy a workflow in a manner of seconds.
Workflow Deployments tab
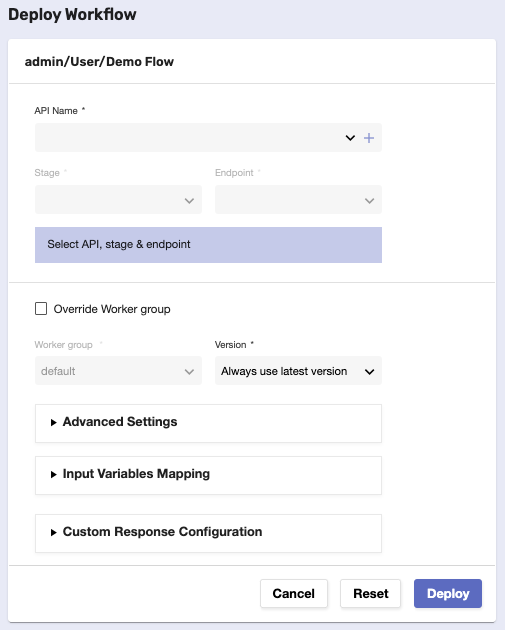
To create the first or another deployment for a selected API, click the blue Create button.
This opens the familiar Deploy Workflow page. You need to manually select a workflow, stage and endpoint to associate with the API.
In case you don’t have a particular element ready for deployment, you can create it on the spot.
Each + button opens a menu that matches the ones covered in the guide for API, stage and endpoint creation.

When you’re done, click Deploy. You’ll be taken back to the previous page.
Workflows page
Click on a flow’s three-dot button in the Actions column. From the menu, select Deploy.

This will lead you straight to the Deploy Workflow page. Since the workflow is defined, you need to choose or add the API, stage and endpoint.
When you’re done, click Deploy. You’ll be taken back to the Workflows page.
Workflow Editor
If you want to deploy a workflow you’ve just finished building in the Editor, click the Deploy Workflow button.
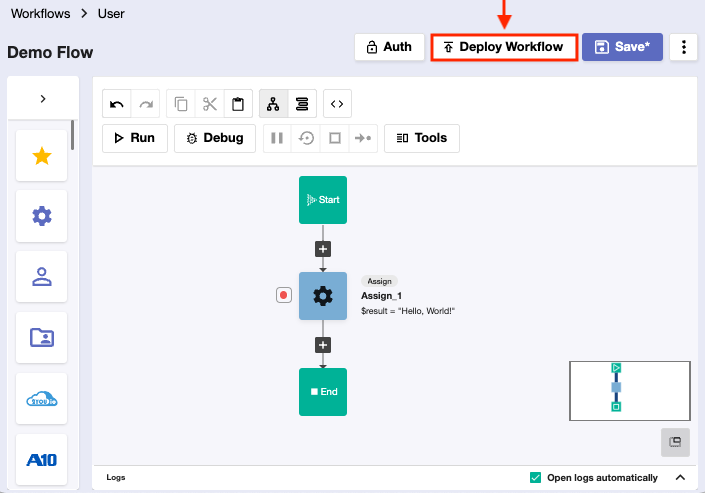
Keep in mind that deploying without saving will lose your unsaved changes.

You’ll once again find yourself on the Deploy Workflow page. Here, you’ll need to link the flow to an API, stage and endpoint
To finish, click Deploy. You’ll be taken back to the Editor.